
You are currently browsing the category archive for the ‘Friends and Connections’ category.
I promised my 16 Polar Sock class participants last night that I would post these links to simplify their searches for high quality fleece. We used the Green Pepper – 504 Polar Sock pattern and had a lot of fun! Thank you all for participating!

Green Pepper Polar Socks pattern
Some places to buy 200 wt Polartec (Polar fleece by Malden Mills, LLC) online:
http://www.milldirecttextiles.com/ (Malden Mills/Polartec LLC)
http://www.seattlefabrics.com/fleece.html (Seattle Fabrics)
http://www.rosecitytextiles.com/ (Pacific Fabrics)
http://www.therainshed.com/ (Rain Shed)
http://www.owfinc.com/Fabrics/Fleece/fleece.htm (Outdoor Wilderness Fabrics)
http://www.fabricmartfabrics.com/xcart/Fleece/ (Fabric Mart, Sinking Springs, PA)
In fact, I think the main reason I have any interest in quilting is due to the chance to be audacious (is that the right word?) in my use of color.
Once I started a wall hanging for elderly friends just because I was fascinated by all the different green colors in their main bathroom. Aqua-greens, mint greens, olive and avocado greens, 50s light greens, forest greens — it was amazing.
I started a search for green fabrics that incorporated both yellow greens and bluish greens. There weren’t too many in the mid nineties! I did a mockup on a foam core board for them because I was so excited about the concept.
Well, that was a mistake. It was clear that either I was NOT communicating my vision or they did NOT appreciate the product.
In any case, I never finished it and I think it’s probably still leaning against the wall behind a stack of fabrics in my sewing room, 12 years later.
——-
Closing with a view of a favorite child in green!

Halloween 2010
Hurrah! I actually left the house today for the first time in at least a week. And I’m way healthier than I was last week at this time, which is obviously a good thing. So!
I drove to Peoria to buy thread for altering my niece’s prom dress and then stopped in at the ‘sewing get-together’ at Michelle’s house. She presented me with a copy of this photo she took, maybe last February:

So I’m gritting my teeth and hiding my eyes and posting what I think is the first photo of me I’ve uploaded. I’ve decided that if I want to share my sewing projects I’ll just have to get over the camera shyness….
It’s the SW TeaGarden T that I made last spring for the Timmel SWAP.
Michelle had also taken a photo of Kellie and me looking through M’s vintage pattern album:

She brought it down to show us when it was almost time to go home and we needed to hurry, but we didn’t want to miss anything!!
I painted it last week, hung it with kite string from a piece of conduit on Saturday, and totally forgot to take a photo on Sunday.
Today the sky is cloudy, so unfortunately the photos lack enough light. I tried the various settings on my point and shoot camera, but none added enough exposure to lighten the background.


Did you notice the ripstop ‘forsythia’ below the banner? Choral concert flowers!
A quick look at the Thai fabric under the lilies. It was there to coordinate with the children’s story from Thailand….
Here’s a glimpse of yesterday’s work:

I’ve been painting with diluted Pebeo Setacolor Transparent on 84″ wide (shrunk from 94″) dry white 10 momme Habotai silk. The photos were taken while the painted sections were still mostly wet.
Initially the close-up views of banners can be really discouraging sometimes. Setacolor has an interesting way of drying – the first sections that dry tend to pull the pigment from the still-wet sections, so they end up darker than the rest. I figure a person can choose to either hate a particular characteristic like this or just go along with it and enjoy it! Over the years I’ve learned that sometimes those ‘imperfections’ can be used to an advantage. In this particular piece, I’m just going to say it’s supposed to look like a small child painted it… 😉

The hair dryer is sitting in the top left corner. I tried drying the edges of the center world/circle before painting the yellow/orange/red ‘people’ around the outside.
A quick look at some of the other tools of the trade, including the iced tea container!

Yet to be done:
— press the silk to set the ink.
— sew the casing for the top where we’ll insert the conduit for hanging.
— find the picture hanging wire; I’ll need a very long piece.
— determine what sort of finish, if any is needed for the bottom.
Have you painted directly on silk with Setacolor? Did you use resists? There’s not enough sun in Illinois this time of year, nor enough clean space to do heliographic printing on a piece this large, so I’m just painting indoors on three 8 ft tables set side by side, covered with (hot pink!) plastic tablecloths and hoping the color intensity will be okay. I brought along a few silk scarves to use for testing, but ended up just painting along the very bottom of the banner to test colors and consistency, figuring I could cut it off later if it shows. I’ll post an update, but likely not until early next week.
Another ‘blast from the past’ to keep a record of these projects all in one place. Unfortunately I didn’t take regular photos as I painted and decorated, but I do have a few which I have posted below. This first one was taken at night.

Advent 2005, Christmas and Epiphany Sundays at Willow Springs Mennonite Church, based on the series by the Mennonite Church Advent Writing team from Saskatchewan as published in the Leader and the Mennonite Bulletin Series, Faith & Life Resources, cover designs by Grant Unrau.
Each week had a theme phrase and a flower:
God’s Unstoppable Purpose…
…Surprises! – Crocus – God meets us when we least expect it.
…Is Faithful! – Cactus – God is faithful when we cry out.
…Restores! – Clematis – God restores and transforms our world.
…Invites! – Orchid – God invites us into the story.
…Is Unimaginable! – Poinsettia – God comes to live with us.
…Breaks Forth Anew! – Sunflower – God in history, God’s future.
Each week I added one new purple flower (based on the bulletin covers) to the blank natural canvas banner. For each Sunday of Advent: crocus, cactus, clematis, then orchid.

Purple Flowers Advent 2005 Bulletin Covers
Then for Christmas Sunday, a red poinsettia.
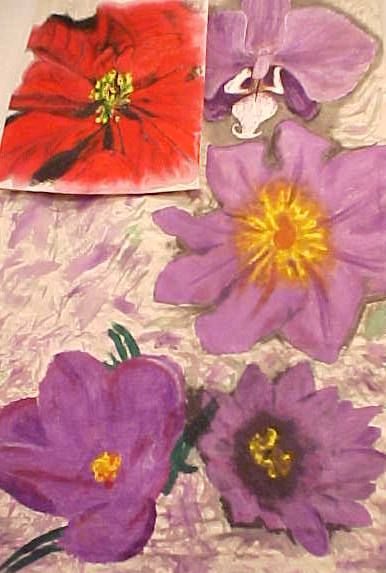
For Epiphany Sunday, a yellow sunflower.

Bulletin Covers Advent 2005
I used Dharma’s pigment dye painted directly on natural canvas. I thickened some of the liquid pigment; also used an opaque white under any yellow and white parts of the flowers. About halfway through December someone asked if I could adapt the purple flowers in this banner as the basis for their wedding banner, so I painted the poinsettia and sunflower on a separate piece of canvas.
Advent wreath. We started with a plain wreath and candles. Some purple tinsel was added each week of Advent. Christmas Sunday I added the red stars; Epiphany Sunday I added gold stars.

Here’s a view of the whole thing, including the sunflower added for Epiphany Sunday. You can see the purple velour, red knit ribbed fleece, and the yellow silk charmeuse scarf on the podium and the gold stars that had been added to the Advent Wreath.
We did it! We started planning back in January! We had a delay due to health issues in late February.
But last Wednesday morning, April 1st, we took the 8:30am Illini Chief Amtrak train to Chicago, walked toward the lake to catch the CTA Brown Line train north to Fullerton and walked to the Apollo Theater to pick up our tickets for the afternoon show. When I asked, the guys at the box office suggested that we eat lunch at the Salt & Pepper Diner across the street on North Lincoln. It was a good, leisurely choice; the sweet potato fries were tasty, the sandwiches cooked just right and the wait staff was great. Just the right number of goofy April Fools Day jokes… 😉
We walked back to the theater and found our seats: 3rd row, center section, with our heads just a few inches above the musicians directly in front of us. The perfect location to view MDQ! The show was spectacular and a lot of fun!
This production made the four famous musicians seem a lot more like ‘real’ people to me; for instance, I really only remember being aware of Elvis Presley a few years before his death. I was a child during most of his years of fame; I was aware of his music, but not very aware of his personality. In Million Dollar Quartet, Elvis is portrayed as quite young and anxious and regretful about his earlier decision to leave Sun Records.
All the characters in the show did a great job; we had a lot of fun watching the drummer, Billy Bob Shaffer’s playing and facial expressions.
One person in our party liked Lance Guest’s acting the best; John thought Lance most accurately portrayed Johnny Cash’s character.
Keith Harrison, who was playing Jerry Lee Lewis, definitely brought a lot of energy to the show.
My dh Dale was impressed by Brian McCaskill’s ability to show a wide range of emotions while being the cement that held the show together with his portrayal of Sam Phillips.
Pam and I were pretty sure that Gabe Bowling, understudy for Perkins and Presley, was sitting directly in front of us during the show, but we were too shy to confirm it.
At the end of the show we took a quick hike to the EL, caught the train south to the loop and managed to get to the Amtrak station before the rush hour crowds descended. lol. We were home by 9pm!
The biggest compliment I heard? My dh, who generally drags his feet about going to the theater or concerts, suggested last night that maybe we should go back and see the same show again in a few weeks.
It would be fun to have a closer look at the specific musical contributions each of the characters brought to the quartet. The show at the Apollo Theater has been extended to May 24th, with 2 shows each Sunday, including Mother’s Day! (update 4/14 – the show has been extended to June 7)
I waited to write this review, hoping the one photo of us that Pam took with her camera would be available to post. I doubt if anyone’s figured out how to get it off her phone yet, so I’ve gone ahead and posted because I wanted to be sure to let Birgitte know that we’d thoroughly enjoyed the show. We even found her name in the Biographies in the program: “She acted as the movement coordinator for Million Dollar Quartet at the Seaside Music Theater in Florida and at the Village Theatre in Washington.” She also has choreographed various shows, including Baby It’s You, the Shirelles bio in Los Angeles. I’d personally like to hear more about the “new MOBIL clothing concept” she has designed… Birgitte?
The challis has a prominent design that is printed off-grain (about 3 inches across the 59″ fabric.) I decided to follow the printed pattern rather than the true grainline hoping that the natural drape of this rayon woven challis fabric will cover the sin of off-grain cutting. Clearly it would look very bad to have the design sliding at an angle off the bottom of the skirt hem! Time will tell if I made the right decision.
The next step in making this green rayon challis skirt is to cut the front panel and the pocket bags and to get my serger set up on a table and remind myself how to use it! Oh, and change out the pink thread that’s on it for a medium gray or whatever will look best; I haven’t even looked at my serger thread stash for several years.
I plan to cut the front panel 30″ wide. I may decide to add a back center seam to the back panel, which is currently cut to finish about 58″.
OR I could cut the pocket bags onto the skirt panels…but then I’d need to make the two panels a lot closer to the same size! Hmmm. Decisions. Decisions.
Last fall my mother was wearing a skirt that she said I’d made her many years ago. It was a wool challis border print for which she’d found a new updated top. She suggested that it would be ‘fine’ if I’d like to make her more similar skirts….
So, in January when Michelle** offered two skirt lengths of a green rayon challis foulard print, I jumped at the chance! (Mom has green eyes!)

Green Rayon Challis
Mom, who will be 80 this fall, measured the old skirt and sent an email with the info:
1.2″ waistband (serged) with elastic inside
Pockets inside both side seams
Bottom width: 58″
Width of skirt 6″ below waist: 52″
Hem: 4″
I also got her current waist and hip measurements and calculated that I’d need to cut the skirt 39″ long x the width of the fabric (59″). I cut the waistband 44″ x 3″, which is probably longer than necessary. I must have added some long, ‘freehand’ darts at the waistband to reduce the fabric bulk between the waist and lower hip. I really don’t remember sewing the wool challis skirt, so I know it was a quick ‘n’ dirty project, no doubt all serged.
Initially I figured I’d have to add a side seam if I wanted to make the big pocket bags that I usually put into challis skirt side seams. Or maybe I could just stick with one pocket and one side seam; but with only one seam, I’d prefer to put that seam in the center back.
My experience with rayon challis (compared to the sturdier wool challis) is that it might be better to make the skirt a little fuller than the original 58 inches and to cut separate pieces for the front and back. In that case, the pockets would be easy to install. I’ll probably move the side seams slightly to the front so the pockets bags will be at her hip bones and thus less bulky.
I’ll tell you more in my next skirt-making post.
**For the last two months Michelle has been hosting several regional PatternReview gals at her home for a Sewing-Saturday. It’s been SO much fun to set aside the time to share and help each other with various sewing projects.

One last photo from the concert flowers. These look almost like yellow butterflies! In the background are the empty risers after the concert.
When preparing for making these flowers I did a little research as I had never looked closely at how forsythia actually grow. I went out into the yard and took a look at how the bush was structured; each branch extended from the ground, rather than a ‘tree’ shape. I cut a couple branches and noticed that the buds for the flowers and leaves were in twos, opposite each other on the branches. At that point I wasn’t sure which buds were flowers and which were leaves…but I did note that there were at least three at the tip of each branch.
In Google image search I found lots of photos that helped: both closeup and distant photos. Wikipedia had a nice description of how the flower petals were shaped and attached. Since I wasn’t going for total accuracy, but planned to make GIANT forsythia, I proceeded to test a few blossoms on an empty branch that I’d stuck into the water fountain we have on the kitchen table this winter. This gave me plenty of meal time to think through the sizes and shapes and ways to attach the flowers. –grin–
The first few blossoms took quite a while to make. I carefully cut curved edges and covered the green wires with brown florist tape to match the wood. That ended quickly when I realized how many of them I’d need. I soon developed a way to cut ripstop multiples with just a few slashes of my scissors! And a way to put the layers together to simply the next step so I could eventually make each flower in less than 15 seconds. (And that’s ME doing it, a person who tends to be slower than average with physical tasks like this.) The main thing I learned was to never work more than 30 minutes at a time on this or I’d end up with painful wrists/hands. Cold packs helped when I’d overdo things, and I treated myself to some candied ginger at bedtime to help reduce the inflammation a little.
In any case, the project was fun to develop and luckily had to be done in a fairly short time so I wasn’t tempted to turn it into a huge ‘perfect’ production. I’m glad I had the opportunity to give my sister-in-law a hand when she needed it!


Thanks for your comments!